The best backups are automated (hence frequent), versioned (so you can recover from deleted or hacked files) and off-site (no worries about natural disasters or the host going bust).
To set them up you’ll obviously need somewhere to store them, and the good news is if you have a Microsoft 365 subscription you already have 1 TB of free OneDrive storage that is probably largely unused. The rest of this post assumes you will use that, but other cloud providers can also be used – there is a slightly different process for using Wasabi, for example.
Unfortunately, most control panels can’t use this sort of cloud storage they expect to backup by SFTP rather than S3 or WebDAV. This is where Duplicacy comes in – it’s fast, efficient and secure, available for Linux, OSX and Windows and the command line version is free for personal use. The catch is it’s a bit tricky to set up and the documentation is sparse, so that’s what this post is about.
This post is specifically about backing up websites from a Linux server – for backups from Windows see our earlier post.
Initial set up
First, we need to download the latest version of the command line executable appropriate to your operating system. For 64-bit Linux at the time of writing this is duplicacy_linux_x64_3.2.4. The first sentence of the Quick Start quide says “Once you have the Duplicacy executable on your path…”, so we’ll start with that.
Connect to your server console via SSH using a program such as PuTTY (from Windows) or Terminal (from OSX). You will need root privileges to do most of the steps below. If you are a “sudo” user you can use this command to become root temporarily:
sudo -i
You can use the following commands to download the Duplicacy program to /usr/local/bin and make it executable. For convenience, we’ll rename it to “duplicacy” as well.
wget https://github.com/gilbertchen/duplicacy/releases/download/v3.2.4/duplicacy_linux_x64_3.2.4
mv duplicacy_linux_x64_3.2.4 /usr/local/bin/duplicacy
chmod 0755 /usr/local/bin/duplicacy
If you now type this simple command
duplicacy
you should see a version number and a list of options.
The next step in the Quick Start guide is “…change to the directory that you want to back up” (which they confusingly call the “repository”). Let’s assume you want to back up everything under the /home directory.
cd /home
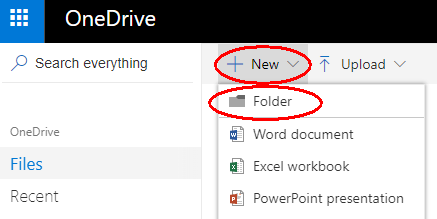
Next we need to create a directory on OneDrive for storing our backups, and obtain authorization to use it. Using a web browser, log in to onedrive.com and select Files > New > Folder and give this folder a suitable name, such as “Duplicacy”.
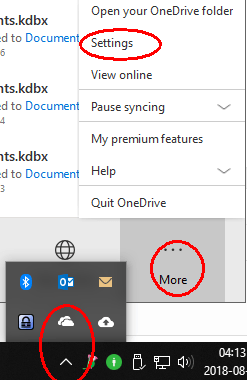
You probably don’t want to synchronise this new folder to your PC, so if you use OneDrive on Windows, open your OneDrive settings (taskbar > cloud symbol > More > Settings):
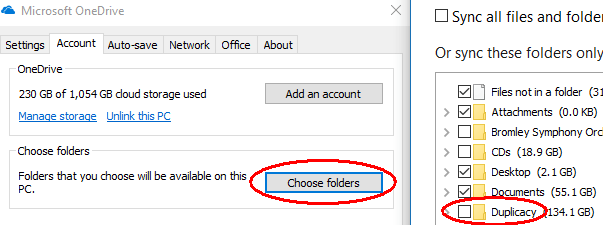
Then click “Choose folders” and make sure the new backup folder is NOT selected.
Next, visit https://duplicacy.com/one_start in a web browser and click “Download my credentials as one-token.json” (links for other storage providers are here). Upload this to the “repository” location on your server (e.g. /home). You can do this using WinSCP (Windows) or Transmit (OSX).
(Optional) It’s considered good practice to encrypt “data at rest”, which can be enabled using the ‘-e’ option below. I recommend generating a strong, unique password and saving it in a password manager.
Finally you need to choose a “repository id” to identify this computer. A good choice would be the hostname (it must only contain letters, numerals, dashes or underscores). Let’s call it “server”.
Putting this all together, we can now initialise Duplicacy with the following command:
duplicacy init -e server one://Duplicacy
You will be asked “Enter the path of the OneDrive token file (downloadable from https://duplicacy.com/one_start):” and the answer will be the filename and location you used above, for example:
one-token.json
If you used the ‘-e’ option you will also be prompted to “Enter storage password”.
To save having to enter the token location and password every time you run duplicacy and enable unattended backups, you can save them in the preferences file. The commands to do this are described on the Managing Passwords page of the wiki. I recommend moving your token file inside the .duplicacy folder (which has been created by the ‘init’ command above), and setting the permissions so that only root can read it.
mv one-token.json .duplicacy
chmod -R 0700 .duplicacy
duplicacy set -key one_token -value .duplicacy/one-token.json
duplicacy set -key password -value [type your password here]
Making backups
To specify the files to back up, you must create a text file called filters in the .duplicacy folder. The rules are specified here and can be quite complex but here’s a simple set of rules that will work on most Linux servers:
# Exclude the contents of "tmp", "cache", "logs" and similar directories (case insensitive, ignore leading dots)
e:(?i)/\.?(tmp|cache|.*logs|.*backups|updraft)/
# Include everything else
You can test them with the command
duplicacy backup -dry-run
You’ll probably want to back up your database contents as well. On Ubuntu you can use “apt” to install automysqlbackup for this (yum has no equivalent but you can install it manually).
apt install automysqlbackup
By default the database backups are created in /var/lib/automysqlbackup – you can change that so they are inside the /home directory simply by editing the configuration file /etc/default/automysqlbackup and setting BACKUPDIR=”/home/automysqlbackup” for example.
When you’re happy that the right files are being included, run the command
duplicacy backup
to start your first backup. Depending on the speed of your internet connection this could take several days to complete! Don’t worry, it will be much faster after the first time.
To schedule regular backups at five minutes past the hour every hour, set up a cron job using this command to edit your cron table
crontab -e
and add a line like this:
5 * * * * cd /home && nice -n10 /usr/local/bin/duplicacy backup >/dev/null
Pruning old backups
Duplicacy includes a prune command for keeping the backup size under control. Their example scheme is quite sensible and can be run as a daily task:
duplicacy prune -keep 0:360 -keep 30:180 -keep 7:30 -keep 1:7
It basically means keep no backups older than a year, only monthly backups after 6 months, only weekly backups after a month, and only daily backups after a week.
To run this command once a day at 6:30 am, use a crontab entry like this:
30 6 * * * cd /home && nice -n10 /usr/local/bin/duplicacy prune -keep 0:360 -keep 30:180 -keep 7:30 -keep 1:7 >/dev/null
Restoring files or directories
If the worst happens and you accidentally delete some files, you need to use the Duplicacy restore command. First you have to find which revision number you want. If you know roughly when the problem occurred, the command
duplicacy list
will show you a list of revisions and the dates and times they were made. Alternatively, you can use the “duplicacy history” command to see when changes were made to a particular file or directory, or the “duplicacy diff” command to compare two snapshots or two revisions of a file. Once you know the revision number, you can use the command
duplicacy restore -r <revision> [pattern]
to restore a folder or file to its original location. For example, if you wanted to restore revision 42 of folder mysite and all its contents, the command would be
duplicacy restore -r 42 +mysite/*
There are other options shown in the documentation. By default, any existing files in the folder you are restoring to will not be overwritten or deleted.