There’s a useful article on Wired about using your phone to digitise your documents https://www.wired.com/story/phone-declutter-your-home-quarantine-coronavirus/
Category Archives: IT news
Using a QR code to give visitors your Wifi details
 I wish more people would do this, it makes access to Wifi much easier: https://www.wikihow.com/Make-a-QR-Code-to-Share-Your-WiFi-Password
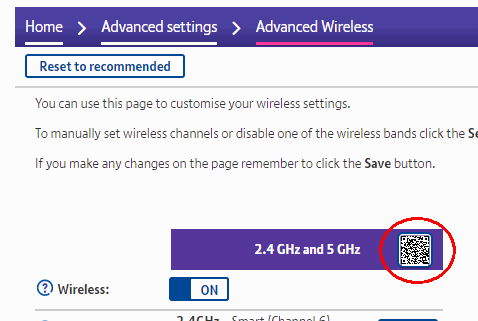
Update: If you have a BT HomeHub, the QR code you need is already available in the administration pages:
Server backups to OneDrive using Duplicacy
The best backups are automated (hence frequent), versioned (so you can recover from deleted or hacked files) and off-site (no worries about natural disasters or the host going bust).
To set them up you’ll obviously need somewhere to store them, and the good news is if you have a Microsoft 365 subscription you already have 1 TB of free OneDrive storage that is probably largely unused. The rest of this post assumes you will use that, but other cloud providers can also be used – there is a slightly different process for using Wasabi, for example.
Unfortunately, most control panels can’t use this sort of cloud storage they expect to backup by SFTP rather than S3 or WebDAV. This is where Duplicacy comes in – it’s fast, efficient and secure, available for Linux, OSX and Windows and the command line version is free for personal use. The catch is it’s a bit tricky to set up and the documentation is sparse, so that’s what this post is about.
This post is specifically about backing up websites from a Linux server – for backups from Windows see our earlier post.
Initial set up
First, we need to download the latest version of the command line executable appropriate to your operating system. For 64-bit Linux at the time of writing this is duplicacy_linux_x64_3.2.4. The first sentence of the Quick Start quide says “Once you have the Duplicacy executable on your path…”, so we’ll start with that.
Connect to your server console via SSH using a program such as PuTTY (from Windows) or Terminal (from OSX). You will need root privileges to do most of the steps below. If you are a “sudo” user you can use this command to become root temporarily:
sudo -i
You can use the following commands to download the Duplicacy program to /usr/local/bin and make it executable. For convenience, we’ll rename it to “duplicacy” as well.
wget https://github.com/gilbertchen/duplicacy/releases/download/v3.2.4/duplicacy_linux_x64_3.2.4
mv duplicacy_linux_x64_3.2.4 /usr/local/bin/duplicacy
chmod 0755 /usr/local/bin/duplicacy
If you now type this simple command
duplicacy
you should see a version number and a list of options.
The next step in the Quick Start guide is “…change to the directory that you want to back up” (which they confusingly call the “repository”). Let’s assume you want to back up everything under the /home directory.
cd /home
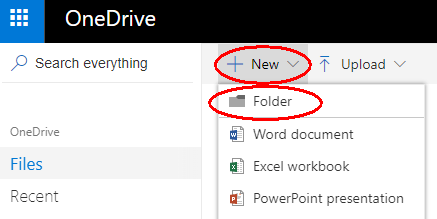
Next we need to create a directory on OneDrive for storing our backups, and obtain authorization to use it. Using a web browser, log in to onedrive.com and select Files > New > Folder and give this folder a suitable name, such as “Duplicacy”.
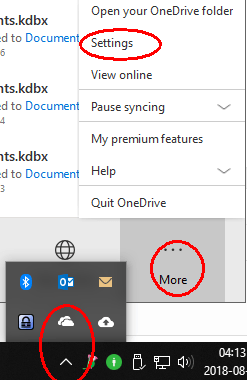
You probably don’t want to synchronise this new folder to your PC, so if you use OneDrive on Windows, open your OneDrive settings (taskbar > cloud symbol > More > Settings):
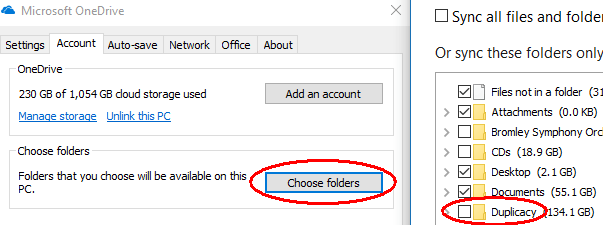
Then click “Choose folders” and make sure the new backup folder is NOT selected.
Next, visit https://duplicacy.com/one_start in a web browser and click “Download my credentials as one-token.json” (links for other storage providers are here). Upload this to the “repository” location on your server (e.g. /home). You can do this using WinSCP (Windows) or Transmit (OSX).
(Optional) It’s considered good practice to encrypt “data at rest”, which can be enabled using the ‘-e’ option below. I recommend generating a strong, unique password and saving it in a password manager.
Finally you need to choose a “repository id” to identify this computer. A good choice would be the hostname (it must only contain letters, numerals, dashes or underscores). Let’s call it “server”.
Putting this all together, we can now initialise Duplicacy with the following command:
duplicacy init -e server one://Duplicacy
You will be asked “Enter the path of the OneDrive token file (downloadable from https://duplicacy.com/one_start):” and the answer will be the filename and location you used above, for example:
one-token.json
If you used the ‘-e’ option you will also be prompted to “Enter storage password”.
To save having to enter the token location and password every time you run duplicacy and enable unattended backups, you can save them in the preferences file. The commands to do this are described on the Managing Passwords page of the wiki. I recommend moving your token file inside the .duplicacy folder (which has been created by the ‘init’ command above), and setting the permissions so that only root can read it.
mv one-token.json .duplicacy
chmod -R 0700 .duplicacy
duplicacy set -key one_token -value .duplicacy/one-token.json
duplicacy set -key password -value [type your password here]
Making backups
To specify the files to back up, you must create a text file called filters in the .duplicacy folder. The rules are specified here and can be quite complex but here’s a simple set of rules that will work on most Linux servers:
# Exclude the contents of "tmp", "cache", "logs" and similar directories (case insensitive, ignore leading dots)
e:(?i)/\.?(tmp|cache|.*logs|.*backups|updraft)/
# Include everything else
You can test them with the command
duplicacy backup -dry-run
You’ll probably want to back up your database contents as well. On Ubuntu you can use “apt” to install automysqlbackup for this (yum has no equivalent but you can install it manually).
apt install automysqlbackup
By default the database backups are created in /var/lib/automysqlbackup – you can change that so they are inside the /home directory simply by editing the configuration file /etc/default/automysqlbackup and setting BACKUPDIR=”/home/automysqlbackup” for example.
When you’re happy that the right files are being included, run the command
duplicacy backup
to start your first backup. Depending on the speed of your internet connection this could take several days to complete! Don’t worry, it will be much faster after the first time.
To schedule regular backups at five minutes past the hour every hour, set up a cron job using this command to edit your cron table
crontab -e
and add a line like this:
5 * * * * cd /home && nice -n10 /usr/local/bin/duplicacy backup >/dev/null
Pruning old backups
Duplicacy includes a prune command for keeping the backup size under control. Their example scheme is quite sensible and can be run as a daily task:
duplicacy prune -keep 0:360 -keep 30:180 -keep 7:30 -keep 1:7
It basically means keep no backups older than a year, only monthly backups after 6 months, only weekly backups after a month, and only daily backups after a week.
To run this command once a day at 6:30 am, use a crontab entry like this:
30 6 * * * cd /home && nice -n10 /usr/local/bin/duplicacy prune -keep 0:360 -keep 30:180 -keep 7:30 -keep 1:7 >/dev/null
Restoring files or directories
If the worst happens and you accidentally delete some files, you need to use the Duplicacy restore command. First you have to find which revision number you want. If you know roughly when the problem occurred, the command
duplicacy list
will show you a list of revisions and the dates and times they were made. Alternatively, you can use the “duplicacy history” command to see when changes were made to a particular file or directory, or the “duplicacy diff” command to compare two snapshots or two revisions of a file. Once you know the revision number, you can use the command
duplicacy restore -r <revision> [pattern]
to restore a folder or file to its original location. For example, if you wanted to restore revision 42 of folder mysite and all its contents, the command would be
duplicacy restore -r 42 +mysite/*
There are other options shown in the documentation. By default, any existing files in the folder you are restoring to will not be overwritten or deleted.
Free off-site versioned backups using Duplicacy
The best backups are automated (hence frequent), versioned (so you can recover deleted or hacked files) and off-site (no worries about fire or theft).
To set them up you’ll obviously need somewhere to store them, and the good news is if you have a Microsoft 365 subscription you already have 1 TB (a thousand gigabytes) of free OneDrive storage (and other cloud providers can also be used).
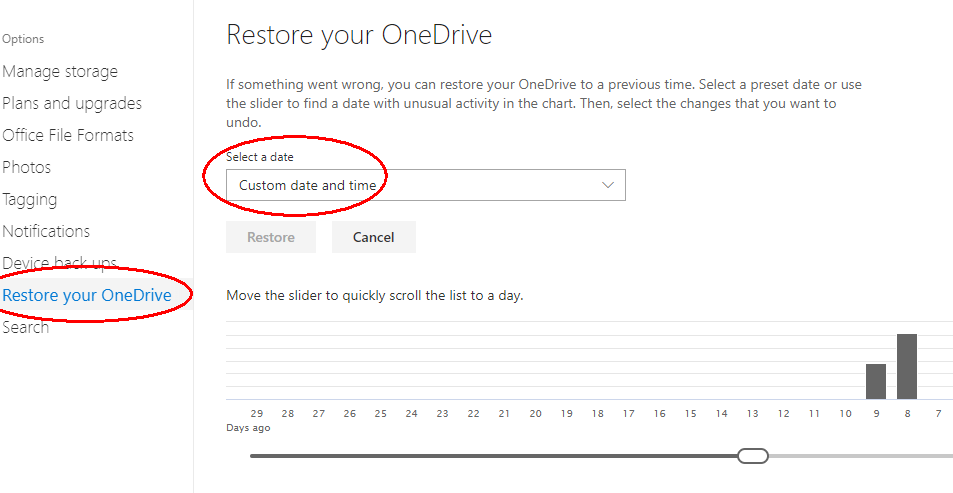
By the way – did you know that if you have all your files synchronised to OneDrive, you can restore older versions for 28 days by going to https://onedrive.live.com and selecting the settings (gear wheel symbol) at the top right, then Options > Restore your OneDrive > Select a date?
Unfortunately, standard backup software like Microsoft File History and Apple Time Machine can’t use this sort of cloud storage. They also struggle to back up large files that are constantly in use, like mail archives and log files. This is where Duplicacy comes in – it’s fast, efficient and secure, available for Windows, OSX and Linux and the command line version is free for personal use. The catch is it’s a bit tricky to set up and the documentation is sparse, so that’s what this post is about.
This post is specifically about Windows backups – for backups from Linux see our later post.
Initial set up
First, download the latest version of the command line executable appropriate to your operating system. For Windows 10 64-bit at the time of writing this is duplicacy_win_x64_3.1.0.exe. The first sentence of the Quick Start quide says “Once you have the Duplicacy executable on your path…”, so we’ll start with that.
On Windows right-click on the Windows start button and open a Windows Powershell (Admin). You will need administrator privileges to install the program and also to run it later in the background, so make sure you do all of the following as an admin user.
You can use the following Powershell commands (or File Manager) to copy the Duplicacy executable we just downloaded to C:\Windows\system32. For convenience, we’ll rename it to “duplicacy.exe” as well.
cd ~\Downloads
ren duplicacy_win_x64_3.1.0.exe duplicacy.exe
mv duplicacy.exe \Windows\system32
If you now type this simple command
duplicacy
you should see a version number and a list of options. If not, enter this command to find what your “path” environment variable is set to, and copy the duplicacy.exe file to one of those locations.
$Env:Path
The next step in the Quick Start guide is “…change to the directory that you want to back up” (which they confusingly call the “repository”). Let’s use our home directory.
cd ~
Next we need to create a directory on OneDrive for storing our backups, and obtain authorization to use it. Using a web browser, log in to onedrive.com and select Files > New > Folder and give this folder a suitable name, such as “Duplicacy”.

You don’t want to synchronise this new folder back to your PC, so open your OneDrive settings (taskbar > cloud symbol > More > Settings):

Then click “Choose folders” and make sure the new backup folder is NOT selected.

Next, visit https://duplicacy.com/one_start and click “Download my credentials as one-token.json” (links for other storage providers are here). Save this to your home folder (e.g. C:\Users\myname).
Finally you need to choose a “repository id” to identify this computer. A good choice would be the computer name from Start > Settings > System > About > Device name. Let’s say it’s “My-PC”.
Putting this all together, we can now initialise Duplicacy with the following command:
duplicacy init My-PC one://Duplicacy
You will be asked “Enter the path of the OneDrive token file (downloadable from https://duplicacy.com/one_start):” and the answer will be the filename and location you used above, for example:
one-token.json
Making backups
To specify the files to back up, you must create a text file called filters in the .duplicacy folder that you should now find in the root of your repository. The rules are specified here and can be quite complex but here’s an example set of rules that will work on most Windows machines:
# Exclude files and folders that begin with a dot
-.*
# Exclude the AppData folder and some others
-AppData/
-Downloads/
-NTUSER.DAT*
-ntuser.dat*
-MicrosoftEdgeBackups/
# Back up everything else for this user
When you’re happy that the right files are being included, run the command
duplicacy backup
to start your first backup. Depending on the speed of your internet connection this could take several days to complete! Don’t worry, it will be much faster after the first time and it’s OK to interrupt it. You will probably want to (temporarily) prevent your computer going to sleep until it’s done by going to Start > Settings > System > Power & Sleep > Sleep then selecting PC goes to sleep after: Never.
If you see an error message saying a file is “in use” or “locked by another user” you can take advantage of a feature that is only available only on Windows and only for administrators called “Volume Shadow Copy”. It cleverly locks the file, takes a quick copy then unlocks it again. You can do it like this:
duplicacy backup -vss
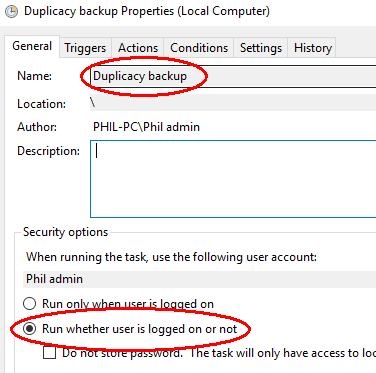
To schedule regular backups once an hour, as an administrator run Task Scheduler (under Windows Administrative Tools in the Windows Start menu) and select Create Task… at the right. Give the task a name and select Run whether user is logged in or not (this prevents annoying pop-up windows every time it runs).
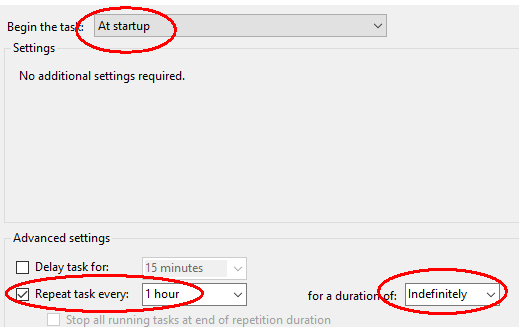
In the Trigger tab, under Begin the task select At startup. Then under Advance settings for Repeat task every select 1 hour for a duration of: Indefinitely.
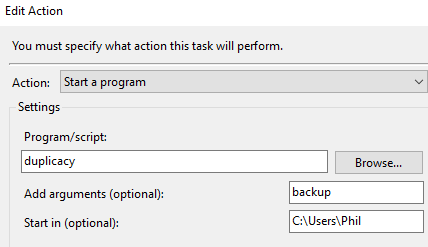
Under the Action tab, for Program/script enter duplicacy with argument backup and Start in (optional): C:\Users\<your home folder>.
Under the Conditions tab, under Network, select the option Start only if the following network connection is available: Any connection.
When you click OK so save the task, you will be prompted for an Administrator’s username and password.
Pruning old backups
Duplicacy includes a prune command for keeping the backup size under control. Their example scheme is quite sensible and can be run as a daily task:
duplicacy prune -keep 0:360 -keep 30:180 -keep 7:30 -keep 1:7
It basically means keep no backups older than a year, only monthly backups after 6 months, only weekly backups after a month, and only daily backups after a week (and hourly backups until then).
Restoring files or directories
You can restore files using the Duplicacy Web Edition graphical application (which is free for this purpose), or from the command line using the Duplicacy restore command. First you have to find which revision number you want. If you know roughly when the problem occurred, the command
duplicacy list
will show you a list of revisions and the dates and times they were made. Alternatively, you can use the “duplicacy history” command to see when changes were made to a particular file or directory, or the “duplicacy diff” command to compare two snapshots or two revisions of a file. Once you know the revision number, you can use the command
duplicacy restore -r <revision> [pattern]
to restore a folder or file to its original location. For example, if you wanted to restore revision 42 of folder Music the command would be
duplicacy restore -r 42 +Music/*
There are other options shown in the documentation. By default, any existing files in the folder you are restoring to will not be overwritten or deleted.
Support for TLS 1.0 encryption ending
Don’t panic about GDPR and make it worse
Stable patches for the “Spectre” vulnerabilities
Avoiding spam words in emails
This is good advice – it doesn’t matter how perfect your mail system is from a technical point of view (SPF, DKIM, DMARC and PTR records set up, unsubscribe links, rate limiting and so on), your whole server may still be blacklisted if some of your innocent content sounds like spam.
Quick guide to speeding up a laptop
It’s really easy to speed up most laptops. Dramatically.
1. Kill most background programs
On Windows 10, press Ctrl + Alt + Del then Task Manager and select the Start-up tab. Disable all non-essential programs one by one. You may have to log in as an administrator if the button is greyed out.
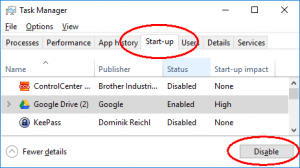
Then go to Settings > Privacy > Background apps and disable most of those. (On Windows 7 search for the command “msconfig” instead.)
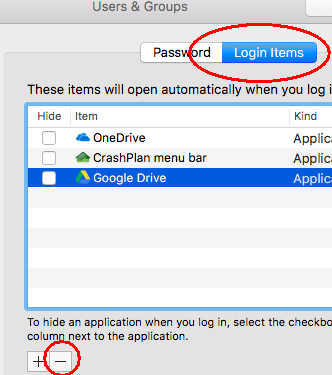
On Mac OSX, go to System Preferences then Users & Groups then Login Items and click the minus button to disable each non-essential program.
2. Nix the antivirus
Believe it or not, most commercial antivirus programs do more harm than good. Uninstall them! On Windows 10 the built-in Defender will automatically activate and is just as effective with far fewer problems. (For Windows 7 search Microsoft.com for free “Security Essentials” which does the same thing.) Mac OSX also comes with enough built-in protection these days. Now reboot your laptop and notice how quickly it starts up!
3. Check the performance monitor
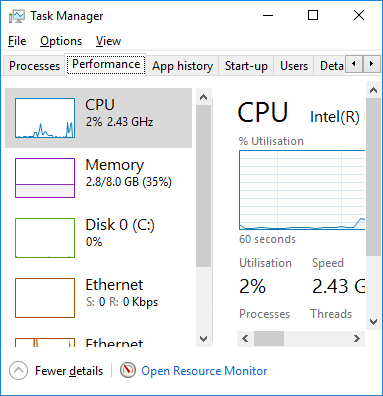
On Windows 10, open the Task Manager again but this time select the Performance tab. The graphs of CPU, Memory, Disk and Ethernet should all be pretty low now. If not, click the Processes tab to find the culprit.
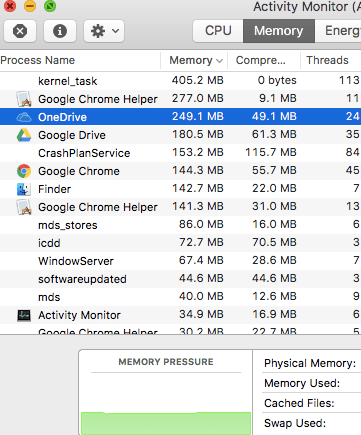
On Mac OSX, go to Finder then Go then Utilities and select Activity Monitor.
If Memory usage is high, adding some RAM is often a quick and cheap (less than £50) solution. If Disk usage is high, changing your hard drive to an SSD (solid state drive) is also cheap now and very effective – and will save battery life. We can help you buy the right ones and fit them. If CPU usage is high, fix the other two first.
4. Check for malware
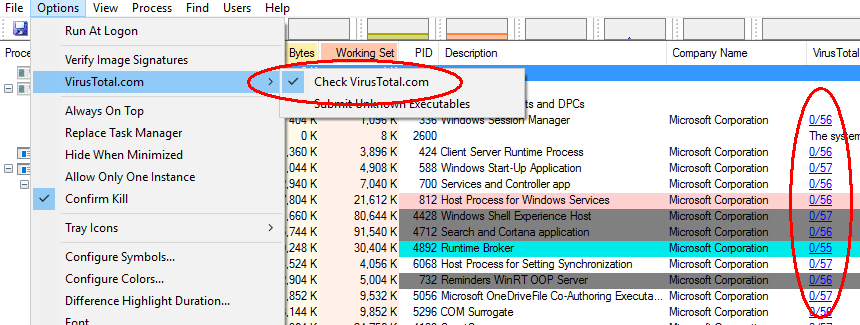
Computers are sometimes slow due to malware. Here’s a really quick way to check if a Windows laptop is infected. Download “Process Explorer” from https://docs.microsoft.com/en-us/sysinternals/downloads/process-explorer. Extract the files (right click, extract all) then run procexp.exe. You will see a list of processes running on your computer (make sure all your usual programs are started – this test won’t check dormant programs on your hard disk).
Now click Options then VirusTotal.com and select “Check VirusTotal.com”. After a short delay this free service will check your computer memory against over 50 different virus checkers and report the results as a column of blue figures at the right. The number indicates how many virus checkers reported a warning (a few false alarms is normal) and the second number is the total number of checks.
5. Install an Ad blocker
This tip is specifically for browsing the internet. Most web browsers now include a “pop up” blocker by default, but you have to install a “plugin” or “extension” if you want them to block advertisements. Popular ad blockers include “AdBlock” and “Adblock Plus” – they’re very similar and easily installed, for example from https://chrome.google.com/webstore for Chrome, https://addons.mozilla.org for Firefox or https://www.microsoftstore.com for Edge (unfortunately not available for Internet Explorer, Safari or phones).
Advertisements quite often contain malware so it’s a good idea to block them for security reasons as well as for speed. Some sites rely on ads for income and won’t load unless you make an exception for them, but I still encourage you to try out an adblocker, it saves a lot of time and aggravation.
6. Install security updates automatically
This last tip is more about security than speed, but it will save you time by installing important security patches automatically, not to mention time spent recovering from an infection. Windows will automatically update itself and Microsoft Office, but what about all your other programs? ? One answer is a free program called Patch My PC that you can download from https://patchmypc.net/. Mac OSX users don’t need this because the App Store controls all updates.
Enjoy your fast laptop and tell your friends!
How to send something confidential by email.
 How do you send confidential information to someone over the internet, so that only the intended recipient can read it? It’s a simple question, with a simple answer (encrypt it) that is easier said than done. When you think about it many of the emails we send could be embarrassing or worse in the wrong hands, so take a moment to find out how.
The easiest solution for most people is probably to use a trusted provider to do it all for you, rather than go through the pain of exchanging keys with all your correspondents.
- Gmail
The good news is Gmail already (since 2014) encrypts all messages between Gmail accounts provided you use the official Google apps or a web browser, so a lot of people are actually using encrypted email without realising it. Similarly, Skype and WhatsApp already encrypt all their communications. If you and the person you’re corresponding with both have access to Gmail accounts, use those. - Protonmail
For everyone else a free Protonmail account is probably the simplest answer. You can use a web browser or their phone app to send and receive messages for free, or pay €4/month to get access to IMAP (and other extra features).
It’s up to geeks like us to help people with technology. So the next time someone emails you something confidential in plaintext that really should be encrypted, gently remind them by giving them your protonmail address or a public key with some instructions like these https://www.techadvisor.co.uk/how-to/…tmail-3636950/
Before you ask, I’m phil.mckerracher@protonmail.com
Exchanging documents that are too large to send as an email attachment is also a problem. Again, the easiest solution is probably a trusted cloud provider like Google Drive, Dropbox or OneDrive. Using 7-zip to compress the document with a password is better than nothing.
