Here are some quick solutions for common email problems including unreliable or slow delivery, spam, no backups and using personal addresses.
Step 1. Get a “cloud” account for storage
If you don’t already have an online account with plenty of storage at somewhere like Gmail (or hotmail.com, live.com, outlook.com, icloud.com, me.com or mac.com) then signing for a free account there will immediately solve three big problems:
- It allows you to train your spam filter by dragging messages from Inbox to the Spam folder or vice versa if they are misclassified. This can dramatically improve spam filtering accuracy.
- It allows you to access and search your entire message archive from a mobile phone.
- It gives you a backup in case your computer is lost or broken.
You can manage several email addresses from one cloud account, or sign up for several accounts if you want some separation. Usually it’s best to have a separate account (and hence password) for each person rather than for each email address.
Don’t worry about picking a good username for your cloud accounts, because those addresses won’t be seen if you follow the steps below. If you are offered the choice of enabling “2-step verification” when you sign up I recommend accepting that because it’s easy to do, and a hacked email account can be used to reset passwords on other accounts so the extra security is worth it.
Storing emails on a desktop PC or laptop is not a good idea because it’s hard to make useful backups, you can’t control spam and you can’t access it from a mobile.
Step 2 – Redirect incoming mail from old accounts
If any of your email currently arrives in an old account with limited storage and inadequate spam filtering and backups, you can now redirect incoming messages to your “cloud” account to fix those problems (otherwise, skip to the next step).
There are three common ways to achieve this:
Incoming alternative 1: Forwarding
Forwarding can be setup at the old email provider or at your domain registrar to “push” new messages to the cloud provider as they arrive. This is often the best solution because it’s easy to set up and there’s no delay in mail delivery. Also, it’s a quick way to create a group address that reaches several people.
The control panel for your old email account or at your domain registrar will have instructions for setting up forwarding – there are too many of them to list here. It’s not a good idea to enable “catchall” forwarding because you will get huge quantities of spam.
Disadvantage: Some providers don’t implement forwarding well. If they don’t do some basic message checks first they can end up forwarding a lot of spam and being blacklisted. If your old provider is one of them, you may have to use one of the alternatives below.
Incoming alternative 2: Use POP3 or IMAP
POP3 and IMAP are protocols that a cloud provider like Gmail can use to “pull” or “fetch” new messages. This works even if the sender is blacklisted and can therefore be more reliable. (At Gmail, IMAP costs money but POP3 is free.)
Disadvantage: The receiving end has to check (or “poll”) for new messages periodically, which means incoming messages can be delayed by as much as an hour, depending on the polling interval.
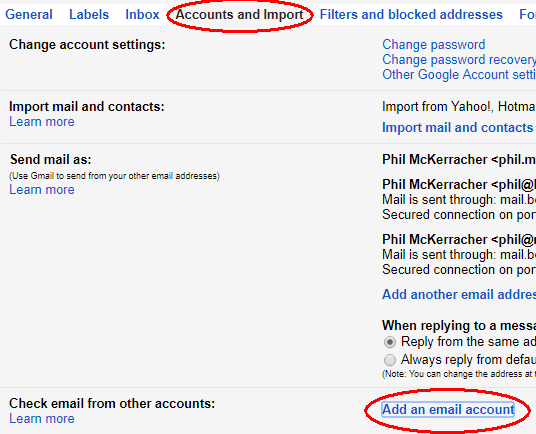
In Gmail it’s easy to set this up – log in at www.gmail.com and click the “gearwheel” symbol at the top right, then select “Settings“.

Next select the “Accounts and Import” tab and under “Check email from other accounts” click “Add an email account“.
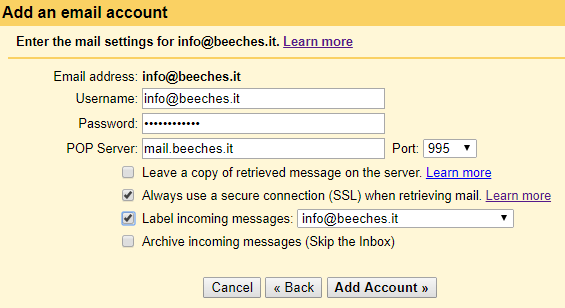
You will need the POP3 username, password and server name of your old email provider. Enter them into the “Add an email account” popup. I suggest checking the “Always use a secure connection” box and the “Label incoming messages” box.
Outlook Email has a similar process that can be found at Mail Settings > Connected Accounts > Add a connected account.
Now send test email messages to all your email addresses and make sure they appear in your cloud accounts. You can always use a web browser like Chrome to check your mail – this is worth remembering if you lose your mobile or have problems connecting from an app. Incoming mail should now be very reliable – check the “Spam” or “Junk Email” folder if a message goes missing.
Gmail has a quirk here that’s also worth mentioning – if you send a message to yourself from Gmail it may not appear in your Inbox, because it’s already in your “Sent Mail” folder.
Incoming alternative 3: Change your MX record
You can change the “MX” DNS record at your domain registrar so that incoming mail goes straight to your cloud provider, bypassing the old mail provider completely. This is fast and reliable but expensive.
If your website is hosted on a private server (or “VPS”), you could set up a mail server there and point your MX record to that – effectively a private “cloud”. It would need to be well managed though. I would not recommend using a mail server on cheap shared hosting because there could be hundreds of people sending spam from the same IP address.
Disadvantage: Cost. At Gmail you need a G Suite subscription costing at least £3.30 per address per month. Microsoft, Amazon and many other smaller companies offer similar services.
Step 3 – Set up sending addresses
Now it’s time to fix things in the outgoing direction. Typical goals here are:
- To get outgoing messages past spam filters and delivered reliably
- To reply from the same address that incoming messages were addressed to
- To hide your “cloud” address and only show your personal or company address
You can skip to the next step if you always send from your “cloud” email address.
The most important point is to make sure that every outgoing message is sent via an “SMTP” server that has been properly configured for that email address, which is probably at your old hosting provider, not the SMTP server for your cloud account. You can get the SMTP server information from your old hosting provider. For example, mail that appears to come from someone@icloud.com must be sent through “smtp.mail.me.com”, hotmail addresses use “smtp.live.com” and so on.
Here, “properly configured” means that your old email host has given you a username and password for the mail address you’re sending from, and your DNS settings contain “SPF“, “DKIM” and “DMARC” records that correspond to that SMTP mail server. Your old email hosting provider will usually set these up for you, but you should check.
If you do try to send from a personal email address through a cloud account’s SMTP server it may appear to work, but messages are likely to be caught in spam filters because those DNS records will be missing or wrong, and mail clients like Outlook will show that your messages have been sent from your cloud provider address “on behalf of” you, which doesn’t look very professional.
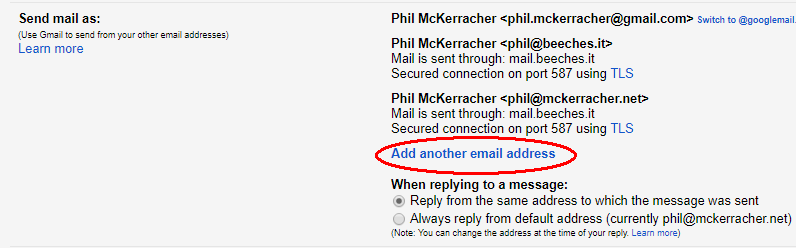
Now go to Gmail > Settings > Accounts and Import, click Add another email address, fill in your real name and your personal or old email address in the popup and click “Next step”.
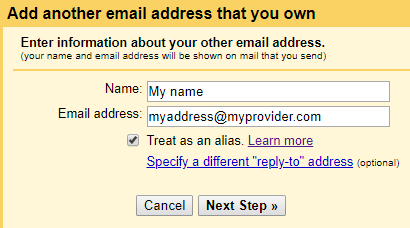
Fill in the SMTP server details from your provider and click Add Account.
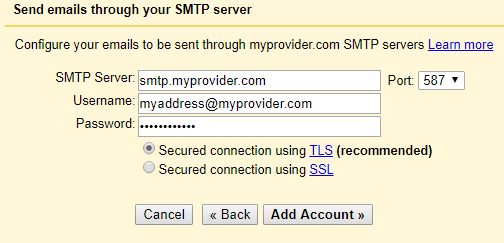
If all is well, a test message will be sent to you containing a verification code and a link you can click to verify the address.
Again, Outlook Mail has a similar process that can be found at Mail Settings > Connected Accounts. Unfortunately other providers including iCloud may not allow this – you will have to add separate extra accounts instead.
It’s worth mentioning that if “two factor authentication” is enabled on an email account (which is strongly recommended but outside the scope of this article), a simple account password probably won’t be accepted here. You will need to get a “one-time password” from your mail provider instead.
Also, some email providers unfortunately won’t allow SMTP connections from outside their network when you’re travelling. In that case your best option is to use a web browser to access their webmail while you’re away.
If your hosting provider can’t provide a reliable smtp server for sending mail (which often happens with shared hosting because one bad user can cause the whole server to be “blacklisted”), you can use a commercial “smtp relay” service instead. I recommend Amazon SES in this situation (not free but very cheap). You may need help to set this up.
As a last resort, Gmail will allow you to use their “smtp.gmail.com” server to send from any of your verified addresses but then the recipients may see your Gmail address shown as “on behalf of” in their mail client.
Step 4 – Connect your devices
By this stage, you should be able to send and receive email reliably to and from all your email addresses, at least using webmail at your cloud provider (if not, contact us and we can diagnose the problem for you). The next step is to do the same using mail apps on your desktop or mobile devices (unless you always use webmail, in which case you can skip this step.)
If you already use the official Gmail or Outlook Mail application on an Apple or Android mobile device, the good news is it’s done already – any new addresses added to Gmail or Outlook Mail as described above will be already be available on your phone or tablet. To test this, open the mail application and start to compose a new message. If you tap the “From” field and see all your email addresses available for selection you don’t need to do anything more.
Otherwise, you will need to add a new email account to your device or mail program for each new address that you want to be able to send from. This will give you the same choice of “From” addresses every time you send a message.
Remember that incoming email will now be forwarded to your “cloud” account(s) if you follow my advice above, so you will only be using these new non-cloud accounts to send, not to receive messages. Therefore, it doesn’t really matter if you create these accounts as “POP” or “IMAP” or “send only”. If in doubt, try IMAP first.
Step 5 – Remove the clutter
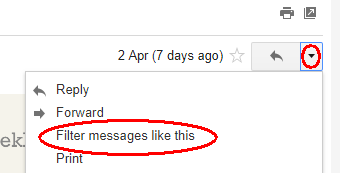
Sometimes the main reason emails get lost is that they’re simply buried in clutter and have scrolled out of view. I’m not talking about spam – that should be out of sight in your “Spam” folder by now – I’m talking about routine messages that don’t need immediate action, like newsletters or reports. It’s easy to move these to a folder automatically, bypassing your Inbox.
Open an example message of this type in Gmail on the web to read it, click the downward triangle at the top right and select “Filter messages like this“.
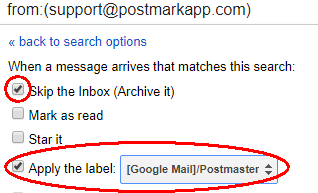
In the next popup, click “Create a filter with this search” and then select “Skip the Inbox” and select a label to apply (in Gmail this is the same as moving something to a folder). In this example, I’m making all messages from support@postmarkapp.com go directly to a folder I’ve created called “Postmaster”.
Another way to organise things which is especially useful for old accounts is to use a desktop application like Outlook or Thunderbird to connect to your accounts using the IMAP protocol (POP3 also works but use IMAP if you can). This not only allows you to create folders and drag and drop messages between them to organise things, but also to drag and drop messages between different accounts. This means you can copy messages from an old archive to your new cloud account, or free up space by moving messages to another account. The IMAP protocol preserves timestamps and subject lines.